Using webpack in multi-page applications
Contents
- Introduction
- I didn't need to be afraid of webpack
- What this article will cover
- So, what is webpack?
- How does it work?
- What about non-JS files?
- A very simple example of webpack in practice
- A slightly more complex example
- Adapting the app for webpack
- The webpack config file - first look
- How does webpack handle our HTML files?
- Using loaders to handle our CSS files
- Using webpack in development
- Getting back the ability to generate production builds
- Conclusion
- Where to go from here
Introduction
Anybody who has worked with a modern frontend framework or library will have come across webpack. I first encountered it about 3 years ago when I started dabbling in React and used trusty old create-react-app to bootstrap my applications.
Like many novice React developers, I had a vague idea of what webpack was doing behind the scenes but I never felt the need to investigate more closely. In fact I was probably a bit scared of webpack. For a long time my 'vague idea' of what was going on didn't develop into any useful level of understanding.
Also, becuase my only experience of webpack was as a tool for packaging up a React app, I assumed it would only work with single page applications. How wrong I was!
I didn't need to be afraid of webpack
Shifting forward to present day, the project I am working on in my day job has a pretty complex front end structure. It's a combination of pages generated by a Java templating language called Thymeleaf and a bunch of separate React apps each with their own entry point. Webpack is used to manage the build process of the various React parts of the app and package up the code.
I have been working on a change to the structure of the React parts of this front end so I could no longer afford to be afraid of webpack: I had to grasp the nettle. And, as is so often the case, facing up to my fears has been nowhere near as traumatic as I expected. In fact it turned out to be quite an enjoyable process.
What this article will cover
I think it worth setting some expectations for this article at the outset. I'm essentially documenting my first serious attempt to understand webpack's workings - so it is largely a beginner level article where I explore webpack's fundamental concepts. But I do go a little beyond beginner level to focus on the way that webpack can be used with multi-page applications because that was after all the concept that drove me to this research.
So, what is webpack?
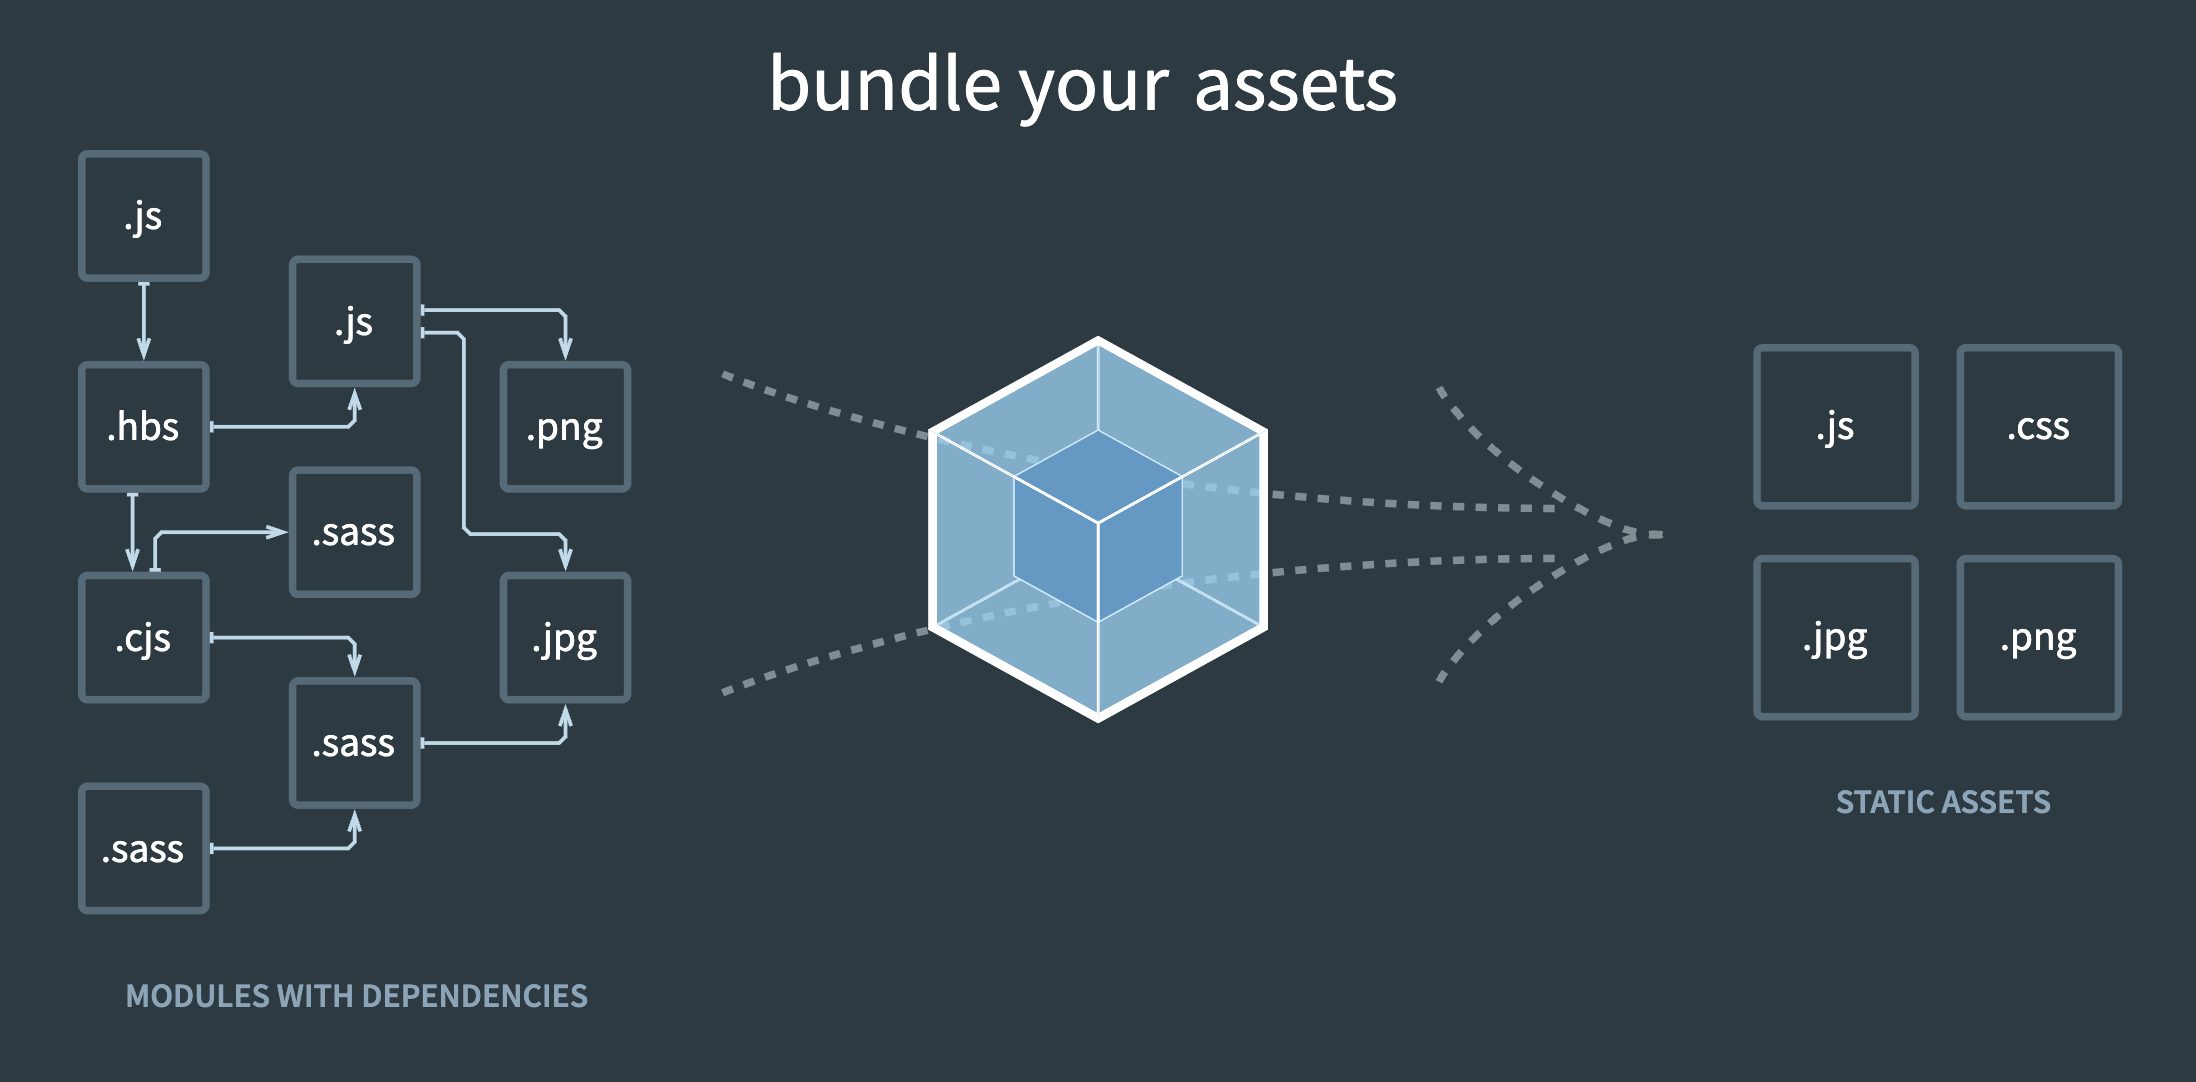
Modern Javascript applications are a combination of many modules, each of which has a bunch of dependencies which may be other JavaScript modules or static assets - think images, CSS/SCSS files, SVGs etc.
Webpack is a JavaScript tool that can take all of the modules that make up your JavaScript (or TypeScript) application, including all of the dependencies of those modules of whatever file type, and bundle them up into static assets that can be handled by browsers. There's a lot more to it but that sentence conveys broadly what webpack sets out to achieve.
This image, from the front page of the webpack website, gives a really good visual representation of what it does.
How does it work?
Initially, to grasp webpack's fundamentals, I found it helpful to think about an application that is made up of just a single HTML file and some JavaScript modules. When I say module I just mean a JavaScript file that can be exported and/or imported. All of these JavaScript modules are linked to each other by way of export & import statements. If you think about a React app, for example, you would be able to find your way from the entry point - ie. the component that is injected into <div id="root"> - to any of the app's JavaScript modules by following the trail of import/export statements.
Well that, in essence, is what webpack does: you supply it with the entry point to your JavaScript modules and it follows all of the 'trails' that exist from import to export to map out the dependency tree accessible from that original entry point. It then amalgamates all of that JS code, from all the separate modules, into a single JS file.
Ok, that's a heavily simplified version but I found it a useful mental model when grappling with the fundamentals.
What about non-JS files?
Real world applications aren't made up of just JavaScript files; they include lots of other file types, eg. CSS (or SCSS), images, SVGs etc. Webpack adds these files to the static bundle(s) with the help of Loaders.
Loaders are generally separate npm packages that need to be installed. Each loader has a specific job in relation to a specific type of file. That job is often some kind of conversion process which means that many loaders have to be used in a specific order. This will make more sense after we have looked at some practical examples in later sections.
Two of the most common loaders are:
css-loaderandstyle-loader
These loaders both deal with CSS, as you might have guessed, and we will see how they are used in a later section.
A very simple example of webpack in practice
I find that the best way to learn is to put things into practice. So in this section we are going to take a simple application that consists of just a single HTML file and a single JS file that is imported into the HTML by way of a <script> tag. We will then add webpack and see what happens.
The start position
The file structure looks like this initially. The JS file is sitting within a src folder because that is where webpack looks for relevant files.

The app - if that's not too grand a term! :-) - takes your date of birth and calculates when your 20,000th day on earth will be (or was; if you're old enough). The inspiration for this came from Nick Cave
The HTML simply renders a date input field and an output section that is populated by Javascript depending on the date provided.
HTML
<!DOCTYPE html>
<html lang="en">
  <head>
    <meta charset="UTF-8" />
    <meta name="viewport" content="width=device-width, initial-scale=1.0" />
    <title>20,000th day</title>
  </head>
  <body>
    <main id="container">
      <h1>Your 20,000th Day On Earth</h1>
      <div id="input">
        <label for="dob">Enter your date of birth</label>
        <input type="date" id="dob" />
      </div>
      <section id="output">
        <h2>Born on</h2>
        <p id="bornOn">Some day</p>
        <h2>Your 20,000th day <span id="tense">will be</span></h2>
        <p id="twentyK">Some other day</p>
      </section>
    </main>
    <script src="./src/index.js"></script>
  </body>
</html>
JavaScript
const dobInput = document.querySelector('#dob');
dobInput.focus();
let tense = 'will be';
document.querySelector('#dob').addEventListener('blur', () => {
  const dobString = dobInput.value;
  const dobArray = dobString.split('-');
  const dobValue = Date.UTC(
    dobArray[0],
    parseInt(dobArray[1]) - 1,
    dobArray[2]
  );
  const bday = new Date(dobValue);
  const twentyKDayValue = dobValue + 20000 * 24 * 60 * 60 * 1000;
  const twentyKDay = new Date(twentyKDayValue);
  if (twentyKDayValue < Date.now()) tense = 'was';
  document.querySelector('#bornOn').innerHTML = bday.toDateString();
  document.querySelector('#tense').innerHTML = tense;
  document.querySelector('#twentyK').innerHTML = twentyKDay.toDateString();
});
Adding webpack
To 'webpackify' this app we need to:
- initialise an npm project:
npm init -y - install webpack (we also need the
webpack-clipackage):npm i -D webpack webpack-cli - add a start script to
package.json- the file should look like this
{
  "name": "webpack-simple",
  "version": "1.0.0",
  "main": "index.js",
  "scripts": {
    "start": "webpack" <--- NEW START SCRIPT
  },
  "keywords": [],
  "author": "",
  "license": "ISC",
  "description": "",
  "devDependencies": {
    "webpack": "^5.93.0",
    "webpack-cli": "^5.1.4"
  }
}
If we now head over to the terminal we can start the app with npm start and see what happens.
Check the results
We haven't defined any webpack configuration; all we have done is install webpack and run it. We are therefore relying on webpack's default settings. Immediately after running npm start the terminal outputs this:
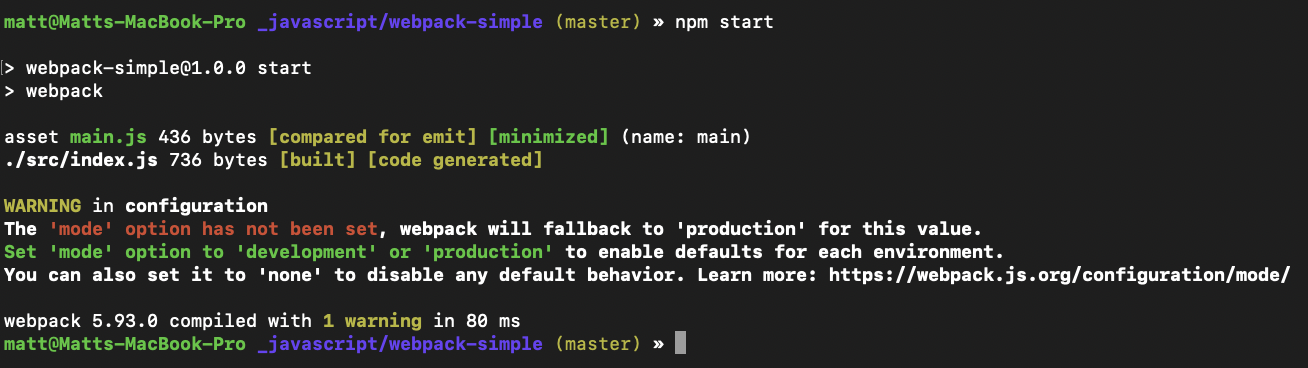
This highlights one of webpack's default settings: namely, that it assumes production mode. The main effect here is that the code is minified, as you will see in a minute. It also shows how much smaller our code is after being minimised - ie. not much in this case but larger codebases will see a much bigger reduction. This terminal output also hints at a new file main.js. If we have a look at the effect on the file structure:
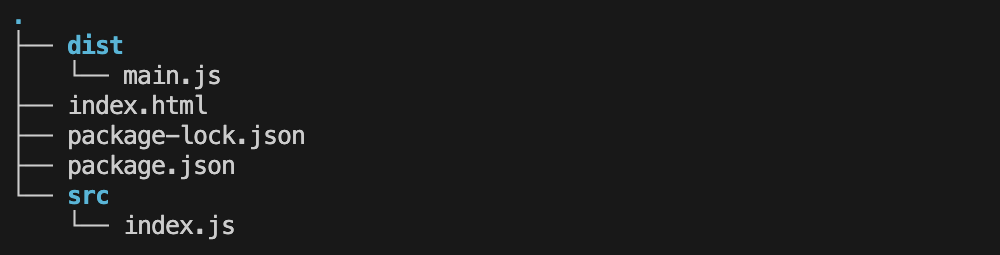
We have a new dist folder in the root of our project containing a main.js file. That's because webpack will, by default, bundle all of your Javascript modules into a file called main.js in the dist folder.
main.js contains the following line of code:
<!-- prettier-ignore -->
(()=>{const e=document.querySelector("#dob");e.focus();let t="will be";document.querySelector("#dob").addEventListener("blur",(()=>{const n=e.value.split("-"),o=Date.UTC(n[0],parseInt(n[1])-1,n[2]),r=new Date(o),c=o+1728e9,u=new Date(c);c<Date.now()&&(t="was"),document.querySelector("#bornOn").innerHTML=r.toDateString(),document.querySelector("#tense").innerHTML=t,document.querySelector("#twentyK").innerHTML=u.toDateString()}))})();
As an aside, the Prettier extension ignores code in the
distfolder by default. If you're wondering why I have used theprettier-ignoreflag here it's because I am writing the markdown for this blog post in VS Code and Prettier will reformat the code without that flag.
If I let Prettier do its thing, this is what the output looks like:
(() => {
  const e = document.querySelector('#dob');
  e.focus();
  let t = 'will be';
  document.querySelector('#dob').addEventListener('blur', () => {
    const n = e.value.split('-'),
      o = Date.UTC(n[0], parseInt(n[1]) - 1, n[2]),
      r = new Date(o),
      c = o + 1728e9,
      u = new Date(c);
    c < Date.now() && (t = 'was'),
      (document.querySelector('#bornOn').innerHTML = r.toDateString()),
      (document.querySelector('#tense').innerHTML = t),
      (document.querySelector('#twentyK').innerHTML = u.toDateString());
  });
})();
As you can see, it's essentially a minified version of our code from src/index.js - at least, the single line version is. Just to check that it works, if we change the <script> src atribute to point to ./dist/main.js the app works just the same.
Summarising this simple example
This is clearly a very trivial example. I have included it:
- as a gentle introduction to webpack's core functionality, ie. minifying your JS code and dropping it into a
distfolder; and - to introduce the idea of webpack's default configuration.
Some slightly unrealistic aspects of this example are that:
- we have to manually edit the HTML file to make use of
main.js. In a real world example we can use webpack plugins to automatically point our HTML to the appropriate file(s); and, - the app contains no other file types - not even any CSS.
So let's look at a slightly more complex example that includes those other aspects, has multiple JS files and more than one entry point.
A slightly more complex example
As I mentioned in the introduction, the main trigger for this exploration was the need to understand how wepack handles more than one entry point. The app we are going to 'webpackify' next has two entry points.
Introduction to the app
In recent months I have developed an interest in Primal Movements. Being a software engineer I naturally had to build a timer app to manage my workouts. Here is the structure of the non-webpack app; it's a pretty simple affair:
File structure of the app before introducing webpack to the mix
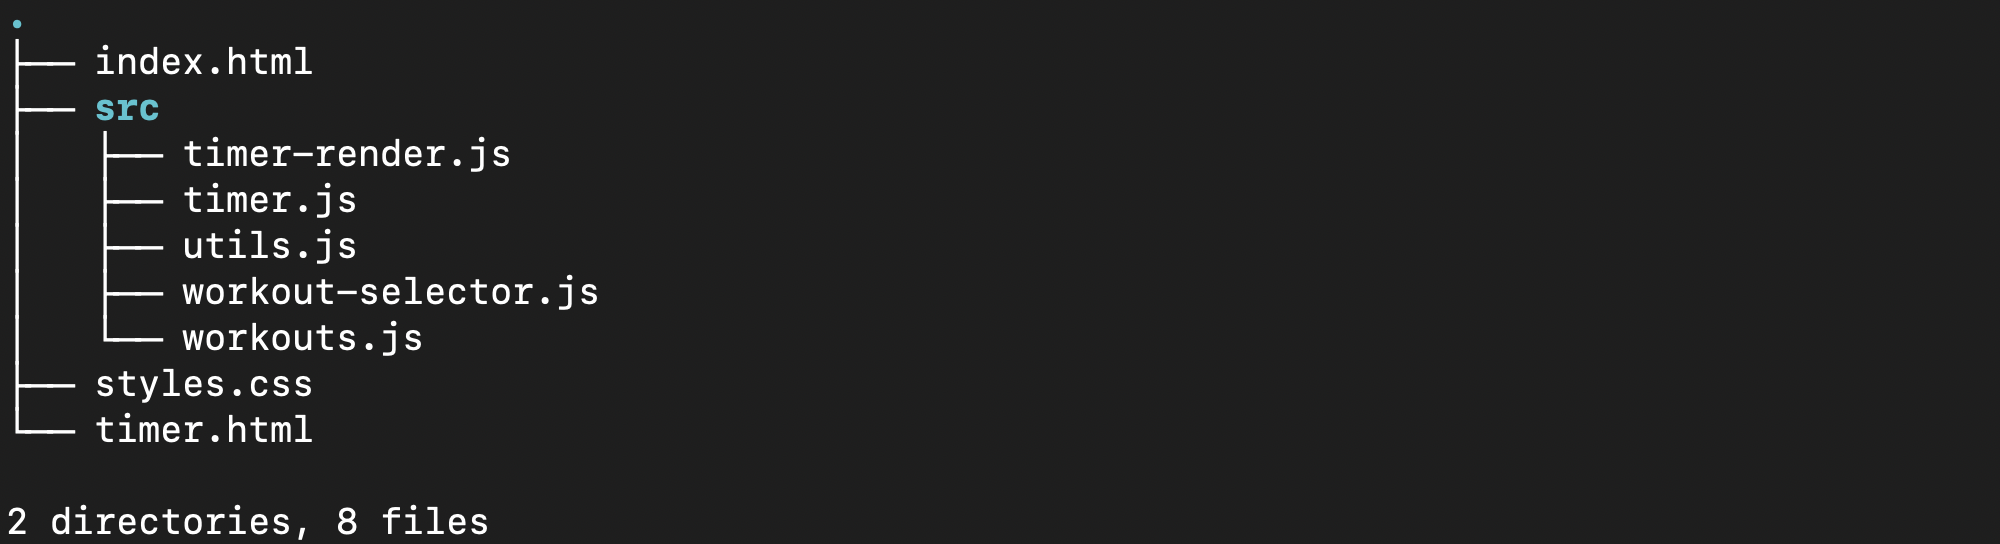
- The two entry points:
index.htmlrenders a list of workouts to choose fromtimer.htmlis the page that renders the timer and displays each exercise as you progress through the chosen workout
- The JavaScript in the
srcdirectory:workout-selector.jsis imported intoindex.htmland powers the workout selection processtimer-render.jsis imported intotimer.htmland handles the DOM manipulation to render the different elements of the timertimer.jsis imported intotimer.htmland handles the countdown timer for each element of the workoututils.jsis imported intotimer.htmland provides some utility functionsworkout.jscontains an array of workout objects and this file is imported into bothindex.htmlandtimer.html
- The styling:
styles.csscontains the styling for the whole application
I'm not going to show any of the code in these files; that would just be a distraction from webpack. All we need to know is the file structure and how the files are connected with each other. If you want to follow along you can find the starter code on GitHub.
To run the app we simply point a browser at index.html. When a workout is selected a new request is made to timer.html with a query string that denotes the chosen workout and away we go.
Dealing with dependencies
One thing to recognise at this point: timer.html imports 4 separate JavaScript files via 4 separate script tags. The order that files are imported is important. For example, the code in workouts.js is used by the code in timer.js so the workouts.js script tag must come before the timer.js script tag in our html. That order of file imports is indicative of the dependency tree. In other words, continuing the example from above, workouts.js is a dependency of timer.js.
This is a pretty simple app. Imagine trying to build a more complex app with dozens, or even hundreds, of JavaScript files. The dependency tree gets pretty complex quite quickly and importing files in the correct order gets tricky. ES6 modules take away a lot of that pain and complexity but browsers don't understand code structured in that way. That's where webpack comes in: it can decipher your dependency tree from your modules and communicate it to browsers without you having to scratch your head too hard.
In this app, since we have two entry points, we also have two dependency trees. We will see later how webpack handles that.
Adapting the app for webpack
In the real world you will rarely need to 'adapt' an existing app to use webpack; you will almost always build apps using modules and the whole import/export business is just something that you do: you don't even think about the dependency tree. I mention it here simply to point out one of the things that webpack is taking care of for you.
1. Install webpack
- initialise an npm project:
npm init -y - install webpack (we also need the
webpack-clipackage):npm i -D webpack webpack-cli - add a start script to
package.json(this is exactly the same script that we set up in the previous example)
2. Add ES6 Import/Export statements to all of our JavaScript files
We have already established that webpack constructs a dependency tree by tracing the paths from import to export within your JavaScript files. So the first thing we need to do is add those import/export statements to our JavaScript files, turning them into JavaScript modules.
So we do have to give some thought to the dependency tree. But in a more straightforward way than ensuring our script tags are all in the correct order. All we have to do is examine the relationship between individual files. We make sure that all modules are exported and if, for example, file-a.js is needed in file-b.js we import file-a.js into file-b.js. We don't care at that moment where else file-a.js might be needed.
It makes sense to rename workout-selector.js to index.js because that is the entry point for index.html. After doing that, the imports follow the dependency tree:
index.jsimports the workouts array fromworkouts.jstimer-render.jsimports:- the workouts array from
workouts.js - the
Timerclass fromtimer.js - some functions from
utils.js
- the workouts array from
timer.js: the Timer class is exportedutils.js: the functions are exportedworkouts.js: the workouts array is exported
3. Remove all of the <script> tags from our HTML
In an application that uses webpack we don't need to manually import JavaScript into our HTML via <script> tags: webpack takes care of the importing for us. We will see how that works soon. For now we will just remove all of the <script> tags.
Try running npm start at this point. A dist directory is created containing a main.js file. This is the result of running webpack out of the box (similar to our previous example). main.js contains the minified, bundled JavaScript from the dependency tree derived from the index.js entry point (ie. index.js and workouts.js) and nothing else. It seems we can no longer rely on webpack's default configuration.
4. Add webpack custom configuration
We have seen what happens when we rely on webpack's default configuration settings. In most cases you will want to define some custom configuration for your apps. That's something we definitely need to do here because our app has more than one entry point.
Create a file called webpack.config.js in the root of the project (it doesn't actually matter what you call the file but let's go with that for now). Add these lines:
module.exports = {
  entry: {
    index: './src/index.js',
    timer: './src/timer-render.js',
  },
};
Make an edit to the script in package.json to add the --config flag pointing to our new webpack-config.js file:
  "scripts": {
    "start": "webpack --config webpack-config.js"
  },
Now run npm start again and take a look in the dist directory. You will see two new files: index.js and timer.js. These are bundled files representing the two dependency trees accessed from the two entry points. So all of our JavaScript has been bundled, which is good news. The next section looks in more detail at the webpack config file.
The webpack config file - first look
We have just seen the profound effect that a few lines of configuration can have on webpack's output. This config file adds some properties & values to the global module.exports object so that they are available to webpack.
The entry property
So far we have added only the entry property. This is where we tell webpack the two entry points into the JavaScript dependency trees. entry is an object containing key/value pairs where:
- the key is the name you are giving to that entry point (to refer to it elsewhere in the config file) and
- the value represents the path to the JavaScript entry point relative to this config file.
The key also ends up being the name of the file that contains all of the bundled JavaScript from that dependency tree. In this example, webpack will create index.js and timer.js in the dist directory, as we just saw.
The output property
We can define where we want webpack to output the bundled files and how they should be named. An example will help to explain.
const path = require('path');

module.exports = {
  entry: {
    index: './src/index.js',
    timer: './src/timer-render.js',
  },
  output: {
    filename: '[name].js',
    path: path.resolve(__dirname, 'dist'),
  },
};
In the output property here we are effectively reproducing webpack's default behaviour. [name] in the filename definition refers to the keys that are defined in the entry property. So we get index.js and timer.js output into the dist directory in the root of the project.
Cache busting
Have you ever been frustrated by browsers using a cached version of a file rather than downloading the changed version? Yeh, me too. Well webpack provides a simple way to combat that. By adding [contenthash] into the filename in the output property of the config file, webpack will generate a hash based on the file contents and include that in the filename. Every time the file content changes, so does the filename. So browsers will always download your changed file.
Here is what the output section of webpack.config.js now looks like:
  output: {
    filename: '[name].[contenthash].js',
    path: path.resolve(__dirname, 'dist')
  }
So now, instead of plain old index.js we get, for example, index.b12c248472993766fec5.js
Removing output directory clutter
Generating files with [contenthash] is great for avoiding browser caching where we don't want it. But it means files don't get overwritten and we have to remove old files from our output directory, which is a bit of a pain. The simplest thing to do is simply delete your output directory before every build. The build process creates a new directory if one doesn't already exist.
There is a plugin called clean-webpack-plugin that does this for you automatically but that seems to be outdated. I'm not sure if there's a more modern version. For now, let's just stick to manually deleting the output directory before every build.
The mode property
While we're at it, let's look at one other aspect of config: mode. We learned earlier that webpack defaults to production mode, which means all output is minified. By changing mode to 'development' the emitted code will be less minified. There are two ways to change mode:
- in the config file:
const path = require('path');

module.exports = {
  entry: {
    index: './src/index.js',
    timer: './src/timer-render.js',
  },
  output: {
    filename: '[name].[contenthash].js',
    path: path.resolve(__dirname, 'dist'),
  },
  mode: 'development',
};
- or in the script that launches webpack (in
package.json):
  "scripts": {
    "start": "webpack --config webpack-config.js --mode development"
  },
We can use either method; they both achieve the same thing.
If you look at the files emitted in development mode you will notice that they are a lot more readable than the minified, production output but still bear little resemblance to our original code. This can make debugging tricky at times. Webpack offers some solutions that are beyond the scope of this article. Take a look at webpack Devtool documentation for more information.
How does webpack handle our HTML files?
So, we have successfully configured webpack to bundle all of the Javascript in our app. But the app won't run because none of that JavaScript is imported into our HTML files. We can't even manually add a <script> tag to each HTML file pointing to the relevant bundled file in the dist directory because the filenames keep changing. So how do we import the JavaScript?
Answer: we use a plugin.
Webpack's architecture is built on plugins and we are going to use html-webpack-plugin to manage our HTML files and automatically point them to the appropriate JavaScript bundles in the dist folder. Before we can do that we need to install the package: npm i -D html-webpack-plugin.
Next we need to update the config file to tell webpack how to use html-webpack-plugin:
const path = require('path');
const HtmlWebpackPlugin = require('html-webpack-plugin');

module.exports = {
  entry: {
    index: './src/index.js',
    timer: './src/timer-render.js',
  },
  output: {
    filename: '[name].[contenthash].js',
    path: path.resolve(__dirname, 'dist'),
  },
  mode: 'development',
  plugins: [
    new HtmlWebpackPlugin({
      template: './index.html',
      inject: true,
      chunks: ['index'],
      filename: 'index.html',
    }),
    new HtmlWebpackPlugin({
      template: './timer.html',
      inject: true,
      chunks: ['timer'],
      filename: 'timer.html',
    }),
  ],
};
Look at the plugins array in the webpack config file above and you will see that we are using two instances of html-webpack-plugin: one for each entry point/HTML file. The plugin constructor function takes a config object as an argument. Looking at the properties of that argument:
- template: this is the path to the original HTML file. The plugin uses this as a template to create the new HTML file in the output directory.
- inject: setting this to
truecauses<script>tags to be injected into the new HTML file pointing to the bundled JavaScript file. - chunks: is an array of keys in the
entrysection that are the destination for bundled JavaScript files needed by the HTML page being handled by this instance of the plugin. - filename: is the name of the generated HTML file in the output directory
Note: these are just some of the config properties that you can pass to the plugin. See the documentation for full details.
This enables webpack to generate new HTML files in the output directory with <script> tags pointing to the required JavaScript bundles. As this is done on every build, webpack knows the hashed filename to point to in each case.
If we run npm start we see that 4 files are now generated.
- Two .js files with hashes in the filename.
- And two HTML files containing
<script>tags withsrcattributes pointing to the correctly named files.
We can now run the app by pointing a browser at ./dist/index.html. The app works! All of the functionality is there ... but none of the styling works. That's because the <link> that points to the stylesheet assumes it is in the same directory. Remember that our generated HTML files are now in the output directory.
We could relocate our stylesheet to the output directory but we are in the habit of deleting that directory before every build (see the section above on 'Removing output directory clutter') so that's not an option.
Or we could point the <link> to the file's location in the root of the project. That would work but it's bad practice. We really want to have all of the files required to run the app in the same place - ie. the output folder.
It's time to explore another new webpack concept that was introduced at the start of this article: Loaders
Using loaders to handle our CSS files
Loaders documentation for reference.
We have seen how webpack finds all of the JavaScript files and bundles them all up together. Well loaders do a similar thing with non-JS files. It works like this:
- we install the required loader packages
- we add some code to the webpack config file that defines the sort of files we want to handle
- then we define the loaders that will handle those files
The loaders we are going to use are called css-loader and style-loader
css-loadertakes our CSS and converts it to valid JavaScriptstyle-loaderthen takes that JavaScript and injects it into the DOM.
1. Install the packages
npm i -D css-loader style-loader
2. Update the config file:
const path = require('path');
const HtmlWebpackPlugin = require('html-webpack-plugin');

module.exports = {
  entry: {
    index: './src/index.js',
    timer: './src/timer-render.js',
  },
  output: {
    filename: '[name].[contenthash].js',
    path: path.resolve(__dirname, 'dist'),
  },
  mode: 'development',
  plugins: [
    new HtmlWebpackPlugin({
      template: './index.html',
      inject: true,
      chunks: ['index'],
      filename: 'index.html',
    }),
    new HtmlWebpackPlugin({
      template: './timer.html',
      inject: true,
      chunks: ['timer'],
      filename: 'timer.html',
    }),
  ],
  module: {  <-- NEW LINES FROM HERE DOWN
    rules: [
      {
        test: /\.css$/,
        use: ['style-loader', 'css-loader']
      }
    ]
  }
};
In the module.rules array, test is a regex to match filenames ending .css. And use is an array of loaders to apply to those file types. It's important to understand that the loaders are implemented in reverse order so, in the config shown above, css-loader will be applied to the css files first and then style-loader, which is what we need.
3. Remove the <link> tags from the HTML files
The CSS is going to be inserted into the DOM as JavaScript so these are no longer relevant.
4. Import the css files into our enrty JavaScript files
Add the following line to the import section at the top of index.js and timer-render.js. This ensures that the CSS is part of the JavaScript modules:
import '../styles.css'
Note that the path is relative to the src directory.
Now, after running npm start, we can point a browser at ./dist/index.html and the app will function correctly with all styling applied.
Using webpack in development
We set the mode to 'development' in the webpack config file earlier but all that means really - for our purposes - is that the output is not minified. When we run npm start, a new set of bundled files is dumped into the 'dist' directory. That's more akin to 'production' mode. We are all used to hot reloading during development, not having to build new bundled files with every change.
To get hot reloading we can use a package called webpack-dev-server. Steps involved to get that up and running are:
1. install the package
npm i -D webpack-dev-server
2. update the start script in package.json
Go from this...
  "scripts": {
    "start": "webpack --config webpack-config.js"
  },
To this...
  "scripts": {
    "start": "webpack-dev-server --config webpack-config.js"
  },
Now, running npm start does the following:
- it starts the dev server on localhost port 8080 (8080 is the default - this is configurable)
- it does all of the webpack bundling that we have come to expect but holds all of those files in memory: they are not output anywhere. It's easy to confirm that; just delete the
distfolder and runnpm start; no newdistfolder is created. - and Hot Module Reloading (HMR) is enabled
Open localhost:8080 in a browser and you see the app. Make changes to the JavaScript and the app reloads with the changes in place. Nice!
To exit the dev server hit Ctrl+C
Getting back the ability to generate production builds
webpack-dev-server definitely improves our developer experience. But the fact that it holds all of the bundled files in memory and never outputs them means we have lost the ability to output bundled files the can be loaded onto a production server. We need to address that.
All we need do is define different scripts to start webpack in different modes. Back in package.json:
- add
--mode developmentto ourstartscript - define a new script called "build" which starts webpack with simply the webpack command and defines production mode
  "scripts": {
    "start": "webpack-dev-server --config webpack-config.js --mode development"
    "build": "webpack --config webpack-config.js --mode production"
  },
To start our app in development mode, with HMR, we run npm start
To output a minified, production files to the dist directory, we run npm run build
Conclusion
This article has covered a lot of the basic concepts of webpack. Hopefully you have learned:
- what webpack sets out to do, in simple terms, and how it does it
- some of webpack's default settings
- how to configure webpack when its default settings don't work for you
- how to handle more than one entry point
- how to include CSS in your bundled files
- how to get webpack to output HTML files that know where to find the right JS bundle
- how to configure webpack for a pleasant developer experience
While this article have covered a lot of ground, in reality it has barely scratched the surface of webpack. There is so much more to it.
Where to go from here
Other file types
This article touches on JS and CSS files but ignores other file types, like: SCSS, image files or SVGs. That could be the next area to look at. There are specific loaders for those different file types. For starters take a look at:
sass-loaderfor SCSShtml-loader&file-loaderfor image files
Separating out CSS
Having CSS embedded in our production JS bundle can lead to poor performance because the CSS isn't loaded until the JS has completely loaded, which can result in a quick flash of unstyled content showing before the stylesheet kicks in.
Check out mini-css-extract-plugin for ideas to prevent that from happening.
Minifying more output
Look at ways that you can minify HTML and CSS output more than it is by default in production mode. Check out optimize-css-assets-webpack-plugin for CSS minimizing. And look again at html-webpack-plugin to find out how to minify your HTML. Note however that you will only want to do that in production mode.
Separating config into dev & prod
Following on from the previous point, you often need to define different webpack config files for development & production. So that's something else to look at.
Best of luck with your further exploraton of webpack!